The Wise Penguin Tips and Tricks Blog

The Wise Penguin brings you Tips and Tricks, Latest Technology news and updates, How-To's, and much more...! Watch and Learn.

10 Recent Articles

Categories

Archives

Showing posts with label Adobe Photoshop. Show all posts

Difficulty rating: 3/10
.
Here is a Photoshop tutorial which I splashed together and I hope it will teach you how to make the best looking buttons for web design, which can then be transferred to software such as Dreamweaver.  I used Photoshop CS4 for this tutorial but I believe it should work with all versions of Photoshop.

THE END RESULT:


Let’s begin! 
Open a new document approximately 500x500 in size. Select the Paint Bucket Tool (), or simply press G on your keyboard, and click on the background to fill it with colour. I used black but you may choose a colour of your preference. Next click on the Rounded Rectangle Tool (), or simply press U on your keyboard, and make a rectangular shape as shown below.


Go to Layer > Layer Style > Blending Options. We need to edit two sections;  Inner Glow and Gradient Overlay.  Use the following settings:

Inner glow:


(Light Blue Colour Code: #00eaff)
Gradient Overlay:


(Dark Blue Colour Code: #115986)
(Light Blue Colour Code: #00d2ff)

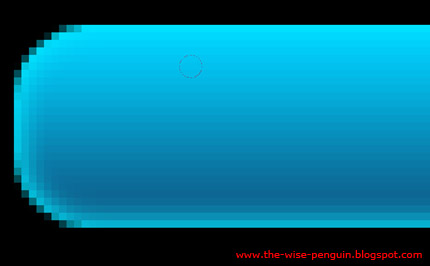
If you used my settings, you should end up with something like this:


Go to Layer > Rasterize > Shape. If you don't do this then you cannot edit the shape of the shape… If that makes sense then. It has to be done if u want your button to look somewhat different and not just a blob.
 

Next, select the Elliptical Marquee Tool (
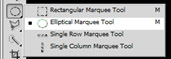
) and zoom into the left side of the button and create a small circle. About this size:


When you take your hand of the click, it should look a little less like a circle and more like a cross of about 5 pixels, depending on the size of the circle.. If your button is larger, then your circle will be larger too. Like this:


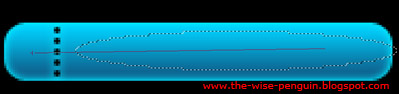
Press Delete on your keyboard. Now move the selected area down slowly with your mouse or by pressing the down arrow on your keyboard and keep pressing the Delete button when you want to create another hole. I created five holes in the shape and it looks like this:


Create a new layer. Click on Layer > New > Layer and press OK. Now, with the Elliptical Marque Tool still selected, create a circle that looks somewhat like this:


Select the Gradient Tool and make sure to set the style as Foreground to Transparent.


Now click on the left of the button and hold. Drag the mouse to the other side of the button (not all the way) and let go.


You should end up with this:


Deselect by click CTRL+D and adjust the layer opacity to your preference.


We are nearly done. All you need to do now is add your text!


Copy the button and add tex to each button and it should look a little something like this:


DONE. It was THAT simple! I hope you enjoyed my first Photoshop tutorial, I will soon post an article teaching you how to use these buttons in Dreamweaver and your own website! Watch out for more Adobe Photoshop tutorials, Tips and Tricks from The Wise Penguin!

WisePenguin,


This is part 2 of
Adobe Photoshop Keyboard Shortcuts. Like I said in my previous Photoshop Keyboard Shortcuts, it's impossible to remember all the shortcuts in Adobe Photoshop. This is a very short post, so here is Part 2 of my list of Photoshop shortcuts that i use the most:

21. SHIFT + BACKSPACE = Open fill dialouge

22. Increase/Decrease brush size by pressing [ or ]

23. CTRL + ALT + o = Zoom document too 100% size;

Double clicking on zoom tool can will zoom your document to actual pixels too!

24. F7 = Show/hide layers menu

25. CTRL + SHIFT + N = Create new layer with dialogue box

26. CTRL + SHIFT + ALT + N = Create new layer Without dialogue box.

27. CTRL + ALT + J = Duplicate active layer with dialogue box

28. CTRL + J = Duplicate active layer without dialogue box

29. CTRL + I = Inverse current selection

30. CTRLD + D = Deselect current selection

31. You probably already knew the Deselction shortcut, but did you know if you press CTRL + SHIFT + D it will reselect previous selection


Stay tuned for Part 3 of Adobe Photoshop Shortcuts ....


As I am a VERY big Photoshop fan, I must say that I really love the keyboard shortcuts. If you enjoy using Photoshop then you will evaluate the keyboard shortcuts as they are very useful and it really helps to build up working speed.

There is a huge amount of keyboard shortcuts in Photoshop and it's Impossible to remember them all by heart, so I made a list here of the ones that I use the most.

Notes:

I'll be using ‘+’ - to define two or more keyboard combinations. For example, CTRL + ALT + DEL etc.

If you are using Macintosh, CONTROL = COMMAND and ALT = OPTION

Photoshop Keyboard Shortcuts:

1. CTRL + C = Copy

2. CTRL + V = Paste

3. CTRL + C + SHIFT = Copy Merged

4. Press X to switch foreground/background color

5. Press D to reset foreground/background color to black/white

6. Press ALT + DELETE to fill the layer with foreground color or SHIFT + DELETE to fill with background color

7. CTRL + Z = Undo/redo previous activity

8. CTRL + ALT + Z = Undo multiple times

9. When working with big files it's very important to save often (5-10 minutes). Press CTRL + S to save

10. CTRL + + = Zoom in

11. CTRL + - = Zoom out

12. ALT + SCROLL WHEEL UP/ALT + SCROLL WHEEL DOWN = Zoom in/ zoom out

13. CTRL + SPACE + CLICK = Quick zoom in

14. ALT + SPACE + CLICK = Quick zoom out

15. CTRL + W = Close current document

16. CTRL + 0 = Set image to fit window

17. F7 = Show/hide layer pallete

18. CTRL + E = Merge selected layers

19. CTRL + SHIFT + E = Merge all visible layers into one

20. CTRL + D = Deselect.

More shortcuts to come in a short wait... get it.. SHORT wait.. never mind.


Related Posts Plugin for WordPress, Blogger...

Hold CTRL and press D to add as to your favorites!

Chat

ShoutMix chat widget